How to Connect Canon Printer to Laptop
Published:
March 16th, 2024
Updated:
March 16th, 2024
Developer:
Version:
1.90.2
Platform:
How to Connect Canon Printer to Laptop
Table of Contents
How to Connect Canon Printer to Laptop?
If your printer comes with a CD, insert it into the computer and follow the instructions to install the driver. You may have to accept the license agreement to complete the process. So, read the complete article to get information on How to Connect a Canon Printer to a Laptop? to get connected to your printer easily.
If you’re using a wireless printer, connect it to your existing WiFi network. This is the most common method.
General Guidelines About Connecting The Printer Easily
Connecting a Canon printer to your laptop typically involves a few simple steps. Here’s a general guide:
- Prepare Your Printer: Ensure your Canon printer is turned on and properly set up. Make sure it has ink or toner, and paper loaded if necessary.
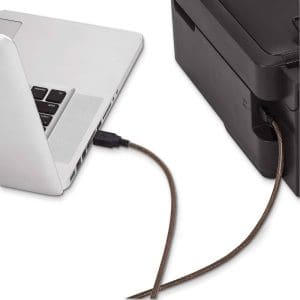
- Connect via USB Cable (for wired connection):
- Plug one end of the USB cable into the printer and the other end into an available USB port on your laptop.
- Your laptop should automatically detect the printer. If not, you may need to install the printer drivers.
- Connect via Wi-Fi (for wireless connection):
- On your printer’s control panel, navigate to the network settings.
- Select your Wi-Fi network and enter the password if prompted.
- Once connected, your printer should display a confirmation message.
- On your laptop, go to the Control Panel or Settings and select “Devices” or “Printers & Scanners”.
- Click on “Add a printer or scanner” and wait for your laptop to detect the printer.
- Select your Canon printer from the list and follow the on-screen instructions to complete the installation.
- You may need to download and install the printer drivers if your laptop doesn’t automatically install them.
- Install Printer Drivers (if necessary):
- If your laptop doesn’t automatically install the printer drivers, you may need to download and install them from here.
- Download the appropriate drivers for your operating system.
- Run the downloaded file and follow the on-screen instructions to install the drivers.
- Test Your Connection: Print a test page to ensure that your printer is properly connected and functioning correctly.
By following these steps, you should be able to successfully connect your Canon printer to your laptop.
1. Connect the Printer to Your Laptop
Before connecting the printer to your computer, ensure it’s plugged in and turned on. You may also need to install any necessary drivers or software.
Once you’ve installed the driver, follow the on-screen instructions to set up your printer. This process may include choosing a printer name and optional preferences, such as setting up printer sharing. Once done, click Next and wait a few minutes while the printer is detected.
If you’re using a Mac, you may need to update the printing software on your computer. Check with your printer’s manufacturer for updates. Alternatively, you can use AirPrint to connect your device to the printer over Wi-Fi. See the video below for a step-by-step demonstration of this method. This is the most popular way to connect a printer to a Mac.
2. Download and Install the Driver
Canon printers are among the most popular on the market. They are easy to use and come with a variety of features. However, just buying a Canon printer doesn’t mean you can start printing right away. You need to download and install the driver for the printer to work. The process can be lengthy, but it is important to do it correctly.
To download the driver for your Canon Printer, visit the manufacturer’s website and look for the “Support” or “Downloads” section. Choose your model from the list and click the corresponding link. Then, follow the instructions to download the latest version of the printer driver. Once the download is complete, double-click on the file and follow the on-screen instructions to install it.
Once the driver is installed, you should be able to print from your computer. However, if you are still experiencing problems, it may be due to a problem with your Windows system. This can be caused by outdated or corrupted drivers. To resolve this issue, you can follow the steps below:
To begin, make sure your printer is plugged in and turned on. You can also try to form a connection with your Canon printer using a USB cable. After that, open the Control Panel and navigate to Devices and Printers. Once you have done this, find your Canon printer in the list of available devices and select it. Once you’ve done this, your printer should be set as the default.
3. Connect the Printer to Your Network
Depending on your printer, it may come with a CD that has the driver already installed or you might need to download it from the manufacturer’s website. Once you have the driver installed, you can connect your Canon printer to your wireless network.
There are a few different ways to connect your Canon printer to your wireless network, but the easiest is to use the WPS method. This method uses Wi-Fi Protected Setup to automatically connect your printer to your router without needing to know the network name or password. To do this, first, turn on the printer and press the Wi-Fi button. Then, press the WPS button on your router. After a few minutes, the printer and router will automatically connect.
If you don’t have a WPS router or prefer to use a different method, you can also manually connect your printer to your wireless network. To do this, first turn on the Canon printer and press the Menu button. Then, navigate to the “Wireless Settings” or “Network Setup Wizard” option on the printer’s display. Then, follow the on-screen instructions to connect your Canon printer to your wireless network.
Once your printer is connected to your network, you can print from your computer using AirPrint. To do this, open the Control Panel and select “Devices and Printers”. Then, click your Canon printer’s name to add it to the list of available printers. If prompted to set up optional preferences, do so and then click Finish.
4. Turn on the Printer
With the foundational setup tasks complete, it’s time to bring your Canon printer to life. Powering on your device is an essential step that enables it to accept print commands and translate digital designs into tangible, high-quality printed output. During the power-on process, your Canon printer may engage in various internal checks and preparations, affirming that it’s ready to fulfill printing needs with precision and efficiency.
Begin by identifying the power button on your Canon printer, which is typically prominently positioned for easy engagement. Once you’ve located it, press the power button with confidence and gentle pressure to initiate the startup sequence. As the device powers on, you’ll likely hear mechanical noises or observe a series of visual indicators that communicate the status of its various systems and components.
Once the device has successfully powered on, locate a power outlet and carefully insert the power cord. Ensure that the prongs of the power connector align properly and that you apply even, consistent pressure to establish a solid connection. Ideally, the outlet should be situated in an area that’s free of obstructions and tripping hazards, preventing undue strain on the power cord and the device itself.
After a brief moment, you should see the ON lamp flash and then remain lit. At this point, your Canon printer is successfully powered on and ready to begin working.
Compatible Operating Systems for Printer Support
Canon printers typically support a range of operating systems. The compatibility may vary depending on the specific printer model. However, Canon generally provides drivers and software for the following operating systems:
- Windows:
- Windows 10 (32-bit and 64-bit)
- Windows 8.1 (32-bit and 64-bit)
- Windows 7 SP1 (32-bit and 64-bit)
- Windows Server 2019, 2016, 2012 R2, 2012, 2008 R2
- Macintosh:
- macOS 10.15 (Catalina)
- macOS 10.14 (Mojave)
- macOS 10.13 (High Sierra)
- macOS 10.12 (Sierra)
- OS X 10.11 (El Capitan)
- OS X 10.10 (Yosemite)
- OS X 10.9 (Mavericks)
- Linux:
- Canon provides Linux drivers for some printer models. However, support may vary, and not all models have official Linux drivers.
FAQs
- Can I connect my Canon printer to my laptop wirelessly?
- Yes, most Canon printers support wireless connectivity. You can connect your printer to your laptop via a Wi-Fi network.
- Do I need to install drivers to connect my Canon printer to my laptop?
- Yes, you may need to install printer drivers on your laptop, especially if it’s the first time you’re connecting the printer or if your laptop doesn’t automatically install the drivers.
- How do I find and download the correct printer drivers for my Canon printer?
- You can easily download the latest version of drivers for your Canon printer from this website.
- What should I do if my laptop doesn’t detect my Canon printer?
- If your laptop doesn’t detect the printer, try the following:
- Ensure the printer is turned on and properly connected (for wired connection) or connected to the same Wi-Fi network (for wireless connection).
- Check if the printer drivers are installed on your laptop. If not, install them manually.
- Restart both your laptop and printer and try connecting again.
- If your laptop doesn’t detect the printer, try the following:
- Can I connect multiple laptops to a single Canon printer?
- Yes, you can usually connect multiple laptops to a single Canon printer, either through wired or wireless connections. Each laptop will need to have the necessary printer drivers installed.
- How can I print a test page to ensure my Canon printer is properly connected?
- After connecting your printer to your laptop, you can print a test page by going to the Control Panel or Settings, selecting “Devices” or “Printers & Scanners”, and right-clicking on your Canon printer. Then, choose “Printer properties” or “Properties”, and look for the option to print a test page.
Conclusion
Connecting your Canon printer to your laptop can be a straightforward process with the right steps. Whether you’re using a wired USB connection or opting for wireless connectivity, ensuring that your printer is properly set up and that the necessary drivers are installed on your laptop is key. By following the provided steps and addressing common FAQs, you can successfully establish a connection between your Canon printer and laptop, enabling convenient printing from your device. So, thank you for visiting our site to get information on this topic. Hope for your return visit to download drivers and software for your devices from our site.